So far you have seen the beginning steps to creating an oil painting, going from the initial idea and sketch phase to the first “underpainting” on the stretched canvas. These are important steps as they set the stage for the size and composition of the finished work. Once these are completed to the artist’s satisfaction, the process of laying in blocks of paint color begins.
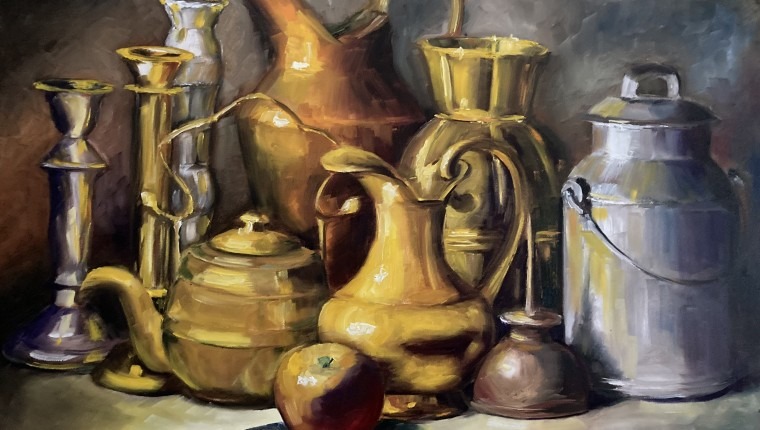
The choice of colors can get very complex, but for the purposes of this blog, it’s not really necessary to go into it too deeply. Let’s just say that a copper object is basically reds and oranges, a brass object is basically yellow, and its complementary color, purple for the darker areas, and an apple basically consists of reds and greens. Below you can see the start of that process. Technically, adding the color can be considered a second underpainting or another “layer” prior to the finished work but it doesn’t have to be. It really depends on the artist and how much depth and complexity he wants to portray in the finished painting. Some of the old masters put multiple layers on the painting, before it was ever considered a finished work of art. I’m not that detailed. I normally paint in the “alla prima” method, wherein there are no layers and no underpainting. You just see it and paint it! I prefer that. It’s a looser interpretation, allowing the viewer to fill in the gaps.

Now, as the artist continues to lay in the color, he will begin to separate the darker areas from the lighter areas using darker or lighter hues of the same color. Thanks to the underpainting, placement of the darks and lights becomes pretty simple. Once all of the colors are on the canvas and each object is “filled in”, the artist can begin to address the details within each object.
In the finished painting, shown at the top of the page, you can see that I put the focus on the warm colors (mainly yellows) in the foreground surrounding the apple. Cool tones are to the right and in the background, so attention remains focused on the apple and the warmer colored objects. There are also subtle distortions that keep moving the eye back to the apple, such as the not-so-symmetrical teapot just to the left of the apple. Further, the lights and darks are in very strong contrast, rather than a gradual transition from light to dark. The intent there is to create drama. After all, it’s a metaphorical depiction of the decline of a major city.
The total time to create this painting was about ten hours, more or less. One hour to place the objects in the shadow box, set up the lighting and do a preliminary sketch of the composition. Two to three hours to paint in the underpainting and the rest of the time to do the actual painting. The final step to creating a painting actually occurs weeks after the painting is finished and completely dry. That step is to coat the entire canvas with a layer of varnish. This “pulls out” the richness of the colors, which dull as the painting dries and the oils in the pigments evaporate, as well as sealing the painting so it doesn’t flake with age. Yes, there’s a lot to know about the how-to of creating a painting, but it is something you can learn. I hope you like it!