by Lea Umberger
In the Tools of the Trade post, I talked about creating costume designs with pencils, watercolors, markers, etc and mentioned investing in a new technology to learn this year, thanks to the Creative Pinellas Artist Grant. I have purchased a Wacom Tablet ( just the basic model) and have started working on a program called Medibang. It is a free program and great with tutorials (plus my 15 year old niece is helping….gotta love teenagers and their knowledge of technology). I have been able to put it right to work incorporating this new technology into the set design work I have been doing on a children’s theatre production of Cinderella.
Set Design Process
There are several steps that happen in creating a set design. I will go over those in a future blog more intently, so you can see the full process, but today- I am going to skip all the way to the point where you start to add/ discuss color. The steps listed below don’t really happen in simple sequential order as Step One, Step Two, Step Three, etc… but more likely happen simultaneously to create the final look.
In most cases I worked on set designs via sketches, then groundplan, then create what is called a FRONT ELEVATION.
FRONT ELEVATION : A working drawing – drawn to scale, showing a flattened front view of a set from the front row. Additionally used to show color / paint needed for the scenic piece.
STEP ONE: PENCIL SKETCH in SCALE
The pencil sketch, this one is completed in 1/4″ scale- which means each 1/4″=1′-0″
This was a pencil sketch with marker overlay and notes added to it.

STEP TWO: GROUNDPLAN/ DESIGN SKETCH
I sketch on tracing paper or onion skin when creating these first round of drawings, so I can easily start over as needed and can trace what I liked from previous sketches as changes are made.
This shows a top/ groundplan view of the design in the space with a front elevation above it. It helps the director know how the actors can move around the set pieces and helps the lighting designer know placement of set pieces to plan their designs around , and lastly it helps the technical director load in the set pieces into the space in the proper place.

STEP THREE: COLOR ( WHERE THE DIGITAL COMES IN)
As the set is designed, color is introduced. This is where I have found digital technology to be the biggest help to me, so far. I am still getting used to “sketching” with it, but with color- you can scan in a sketch, trace the line work and then literally color within the lines.
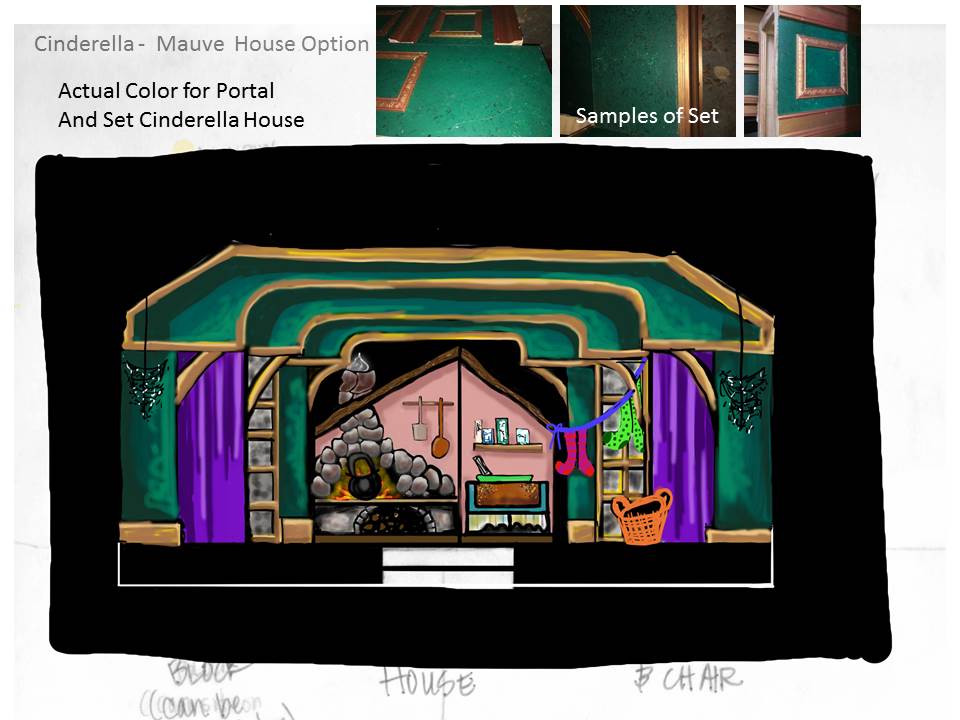
The best part about going digital is being able to present multiple options quicker than if I needed to watercolor each set design individually. For Cinderella’s house I was able to present three options to the director, so we could discuss. Keep in mind, these are some of my first few attempts at using the digital drawing pad, so not as refined at first….but I promise, it gets better.
WHICH ONE IS YOUR FAVORITE?


STEP FOUR: FINAL LOOK
It was an interesting process working and presenting a digital drawing for the first time to review color. As I went into the final version of the rendering, I was able to refine the “painting” to look more dimensional and have more specific color detail. For this set design we are using pieces from an existing piece that is already built and painted, so I was able to pull color from a photograph of the piece and match directly the paint tone. The photos of the piece are at the top of the painting for reference.
Here is the final rendering that was submitted for final approval:


